
eTrack has automated support for NDIS Funding Periods.
Create a Funding Period table, allocate funds and apply new funding when available.
Roll over unused Funding and prevent over spending with informative graphs and dashboards.
Summary of Funding Periods
1. Within a Plan click ![]() .
.
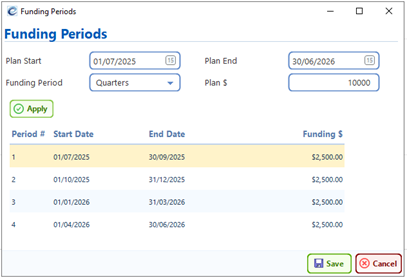
Enter Plan Start and End Dates, Funding Period (eg: Quarters) and the Plan $.
Click Apply.
2. Optionally edit the dates and amounts, ensuring they sum to the Plan $. Click Save.
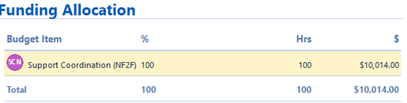
3. In the ![]() dialog, enter the split between Support Items (in %, Hours or $), ensuring they sum to 100%.
dialog, enter the split between Support Items (in %, Hours or $), ensuring they sum to 100%.
4. On the Plan, the Graphs, Budget Items and Budget tables have been updated.
Funding Hrs/$ = total funding across all periods to date (might be > 1 period)
Funding Left Hrs/$ = Funding Hrs/$ minus Billable.
Note. Unused funding is rolled over to the next period meaning it is still available.
5. When Booking Time, you will be prevented from booking time over the available Funding as the NDIS will never allow you to claim this. You can book to Non Billable (if enabled on the selected Support Item).
6. All existing Plans now have one Funding Period with Period = Whole Plan.
If Funds are across multiple Support Categories (eg SC and RC)…
a) Expand Setup/Prices and create a new Funding Component (renamed from Funding Area). Drag and drop the required Support Categories to it and select Relate.
b) On the Plan, tick the Funding Components checkbox (renamed from Multiple Support Categories) and in the field above, select the Funding Component.

Detailed User Guide
1. Create a new Participant or new Plan.
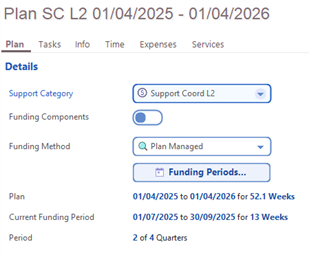
2. Select the Support Category or switch to Funding Components consisting of multiple Support Categories (see 13 below).
3. Select the Funding Method.
4. Click the new [Funding Periods] button
5. Enter Plan Start and End date, the Funding Period type (Quarters etc) and the Plan $ and click Apply.
Optionally edit the dates and amounts as required.
6. As before click OK in the next dialog to update the Plan Name and set the Task Due Dates.
7. The Allocate Funds dialog will now be displayed.
Split the time across the Support Line Items by entering either %, Hours or $ and the others will calculate.
8. A summary of the Funding Periods is shown on the Plan tab. To edit them, click the Funding Periods button again.
9. The Budget Item and Budget table now show both the Plan hours/$ and the Funding Hours/$ Left


10. The Plan tab Graph and the Participant Dashboard now shows the Funding as a step line.
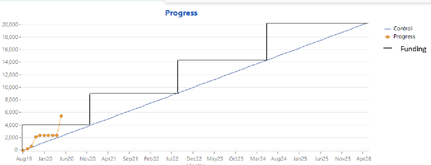
11. The Bar chart has been updated to show the Funding $ to date instead of the Plan $.
12. In the Book Time dialog, a check is done and no more billable time can be booked if the Funding has run out. Non Billable time can still be booked as before if allowed for the selected Support Item (under Setup/Prices/Support Item Groups).
13. Funding Components
The NDIS may allocate funds over multiple Support Categories collectively called Funding Components, for example Support Coordination and Recovery Coaching share the same funding.
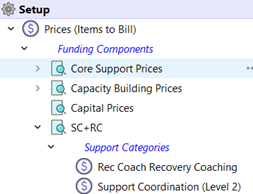
Expand Setup/Prices/Funding Components (renamed from Funding Areas)
Create new Funding Components as required (in addition or instead of Capacity, Core and Capital).
Drag and drop Support Categories (under the Funding Components) to Funding Components and select Relate (or Move). For example, you may like to create this…
14. On the Plan tab, tick the ‘Funding Components’ checkbox (renamed from Multiple Support Categories) and select the Funding Component from the dropdown.

15. You can’t change the Support Category if time has already been booked to a Plan and will need to create a new one and move the time.
To move time, select the Plan, click the Time tab and click [Change] button.