The ‘NDIS Upload’ process is used to claim, from the NDIS, hours booked to Agency Managed plans.
It is separate to the ‘Invoicing’ process which is used to claim for hours booked to Plan Managed and Self Managed plans. Although you can, if you wish, use the invoicing process to create ‘advisory’ invoices to send to agency managed participants to inform them of what you have claimed via the ‘NDIS Upload’.
Before uploading for the first time, complete the Setup at the end.
The full process is explained in detail. If you want to print the steps or copy them to your personal reference manual, use this handy Quick Guide.
NDIS Upload Quick Guide
1.Select Active (or a Participant) in the tree.
2.Click Details icon across the top and the ‘NDIS Upload’ tab.
3.Select a Date range and View=’No Upload#’
4.Review the data and if necessary, filter out rows you want to exclude or that need further attention.
5.Click NDIS Upload button and choose where to save on your fileserver.
6.Login to the NDIS Portal and upload the .CSV file.
7.(Later) Resolve rejections.
Create Upload File
The upload file is a .CSV file created using the NDIS Upload function.
This can be done for a single participant or for all participants within a status group eg Active or for all participants across all status groups from All Participants.

1.In the tree, select a group or participant.
2.Click ‘NDIS Upload’ tab. eTrack will only load hours booked to plans where Funding Method=’agency managed’
3.Select View = ‘No Upload#’ – see note
4.Select a date range – see note2
5.Optionally, click Analyse>> and further filter the rows to display the ones you want to include.
6.Review the data to find any obvious errors such blank support item. Resolve these before uploading to avoid rejections and payment delays. Do that now and start over or filter them out to come back to later. See below Resolving Rejections and Other Problems
7.Click NDIS Upload button.
8.eTrack will create a .CSV file in the correct format and assign a unique Upload# to all rows in the file.
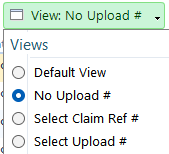
Note: With ‘No Upload#”, all rows that are already uploaded are filtered out. The ‘Default View’ shows all rows within the date range which may include rows that have already been uploaded. However, only displayed rows that don’t already have an Upload# will be included in the .CSV file.
Note2: You may choose a date range that that overlaps dates of a previous upload – only rows that haven’t already been uploaded will be included.
Do not use the Export button as this will be in the wrong format, eTrack will warn you!
The NDIS stipulate a limit of 16 characters for the .CSV filename. The filename is generated by eTrack in the format:
<Upload# >–<from date ddmm>–<to date ddmm><Initials>.CSV
Where
<Upload#> starts with the year followed by a sequential number from 01, eg 2505
<from date> and <to date> are the start and end dates selected on the ‘NDIS Upload’ tab.
<Initials> are those of the selected Participant or the first letter of the Participant Status Group, eg A for Active
For example:
•2401-0101-3101JS.CSV = Upload #1 from 01/01/24 to 31/01/24 for John Smith.
•2486-2910-1011A.CSV = Upload #86 from 29/10/24 to 10/11/24 for Active Participants.
•24102-01120812JS.CSV = Upload #102 from 01/12/24 to 08/12/24 for John Smith (dash between dates removed so as not to exceed the char limit).
Edit .CSV file
You shouldn’t need to edit or even open the .CSV file but if you open the .CSV file in Excel and save edits you must do the following before saving:
•Select the heading of each of the two Date columns. Right click and select Format. Change to Date and select yyyy-mm-dd
•Select the Quantity heading. Right click and select Format. Change to Numbering and 2 decimal places.
This is required because Excel auto-formats dates and numbers so the format required by the NDIS has to be restored otherwise the upload will be rejected.
Alternatively, edit the .CSV using Notepad which does not change the formatting. The data is presented as a line of text with fields separated by a comma.
Upload .CSV file to NDIS Portal
1.Login to the NDIS Portal
2.Click ‘Payment Requests’ box
3.Click ‘Bulk Payment Request Upload’ box
4.Choose file and select the .CSV file you have created.
To see uploads, click Payment Summary box and select ‘Pending Payment Requests’.
View and Clear Uploads
On the ‘NDIS Upload’ tab, the Clear Upload button will clear the upload# of all displayed rows that are ticked. This will reset the rows to a ‘not uploaded’ status.
To display all entries from a previous Upload, select View= ‘Select Upload #’ then enter the Upload#. You can find the upload# in the filename.
To display a specific entry from a previous Upload, select View=‘Select Claim Ref#’ then enter the Claim Ref#. You can find the Claim Ref# by opening the .CSV.
To display all entries (whether uploaded or not) from a date range, select the dates and select View=’default view’.
Right click on a row > Clear Upload to clear just that entry.
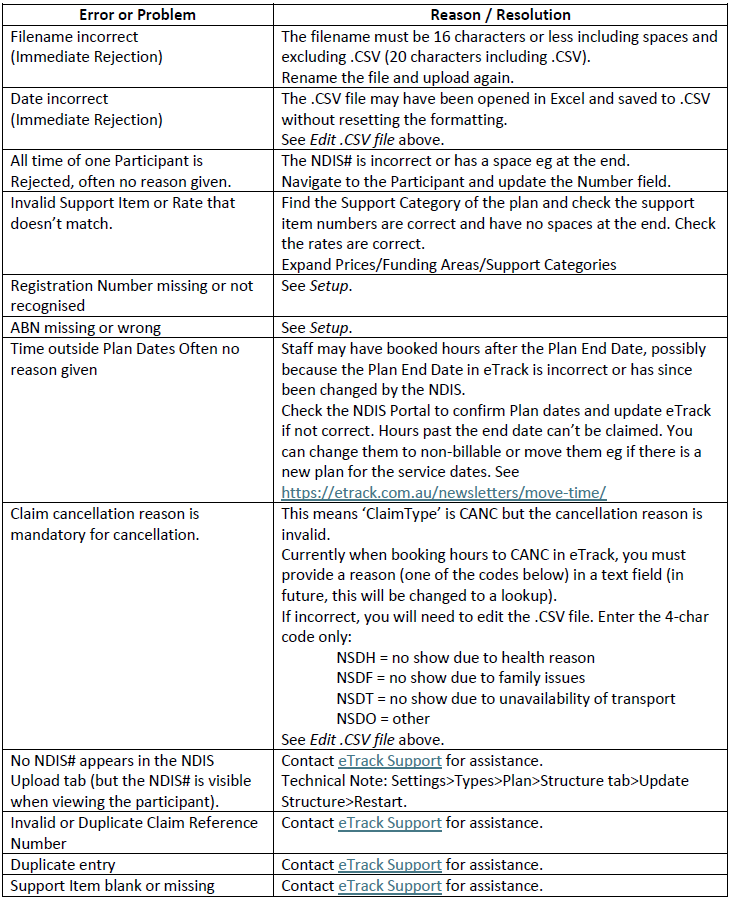
Resolving Rejections and Other Problems
Errors in a Reject file will be available to download or view online in the NDIS Portal Bulk upload web page. In some cases, the whole file will be rejected.
The table below lists common rejection errors and data problems you may notice before doing an upload and how to resolve them.
Upload File Content
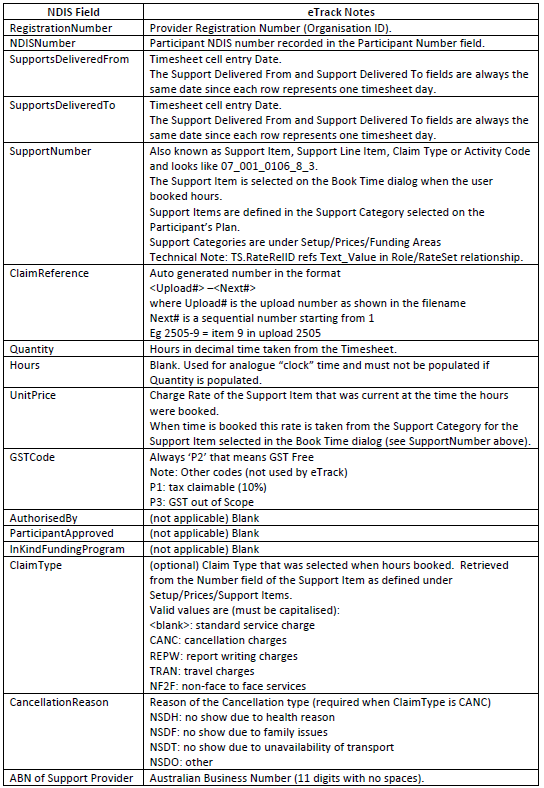
Each row of the .CSV file represents the total hours booked by each staff member for each Support Item of each Plan in one day (if multiple staff book hours to the same support item/plan/date these are sent as separate rows). The following table lists the columns in the .CSV file and where in eTrack the data is retrieved from.
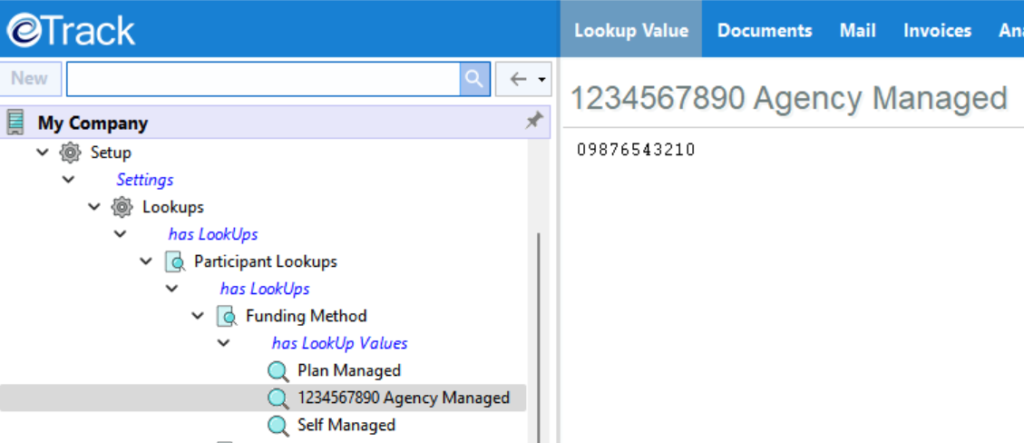
Setup
You need a NDIS Registration Number and an ABN (Australian Business Number).
Record these details in Setup/Lookups/Participant Lookups/Funding Method/Agency Managed
1.Click the ‘agency managed’ heading to open the Rename dialog.
2.Enter your 10-digit Registration Number in the Number field and click Continue
3.Enter your ABN below the line. Enter the whole ABN (not the ACN that is 2 digits shorter).
Both numbers must have only digits (no letters or characters) and no spaces (check there are no spaces at the end that can happen when using copy/paste).
If you have multiple Registration Numbers, contact eTrack Support for custom setup.