
eTrack allows a NDIS Payment (or Results or Remittance) file to be imported and reconciled against the corresponding NDIS bulk Upload of Agency Managed Participants. You can filter the results and clear the Upload # so billed entries can be re-uploaded after fixing any errors. Powerful utilities exist to fix errors for example to move time, change to non billable or change support code and rate.
Bulk Upload and download Payment file
As before, use the ‘NDIS Upload’ tab to create a .csv file and upload to the Bulk Payments section of the ‘my NDIS’ Portal. This file includes an Upload # in the Claim Reference field of every entry (eg 2301-1). This Upload# is also at the start of the Bulk Upload .csv filename. Click here for more on NDIS Upload.
When the corresponding Payment file is available on ‘my NDIS’, download and save the file to your computer. Note the filename will match the corresponding NDIS Upload filename. See ‘How to find the correct payment file’ section below.
Reconcile Payments
- Select any Participant Group or Participant (it works across all data).
- Select the new ‘Reconcile Payments’ tab to right of NDIS Upload
- Either…load a previously imported file by selecting the Upload # from the [Upload #] dropdown or entering the Upload number (eg 2401).
- Or… load a new Payments file, click [Import Payments] button.
Select the Payment.csv (or called Results or Remittance) file that you downloaded.
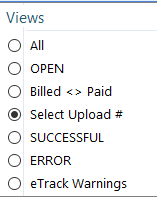
See below section on ‘How to Find the correct Payment File’. - Click the [Views] button at the top to select from the following:
- eTrack will display all rows from the Payment File and match them to billing entries in eTrack (time, KM and other Expenses) that have the same Upload # (as was added during the NDIS Upload).
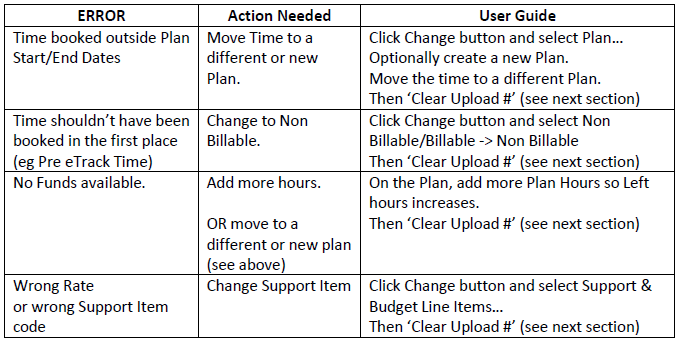
Fixing Errors
To find rows with Errors, click the View button at the top and select ERROR.
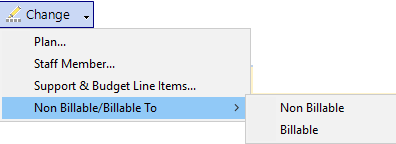
Powerful utilities exist for fixing errors using the ‘Change’ button in the Reconcile Payments or any of the Time tabs. The Change… utility can be used on one row by right clicking and selecting the Change menu item, or used on all ticked displayed rows using the Change button at the top.
You can change time within a specified date range to a new or different Plan, change Staff member, change Support Item and Rate, or toggle time between Billable and Non Billable.
Clear Upload# so can Re-upload
- Filter the results using a combination of the following methods…
Select a View. These are predefined filters.
Select Date range by clicking the date.
Use the Search box
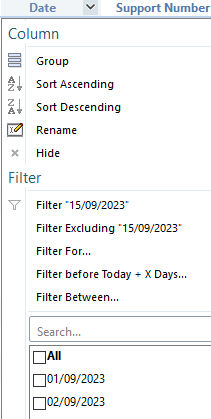
Click [Analyse >>], hover your mouse over a column heading, click the down arrow V and select the items to filter by. Here is the date filter for example…
2. Clear the Upload #
Either right click on a row and select menu item Clear Upload # to clear one row.
OR, tick checkboxes on the left and click [Clear Upload #] button to clear the Upload # from the DISPLAYED rows.
3. Re-Upload to NDIS…
Click NDIS Upload tab, select View=No Upload #, select date range and other filters as required and click ‘NDIS Upload’ button. Click here for details.
eTrack Warnings
eTrack will analyse the Payment file and display the following warnings based on things that might be wrong.
- Claim Ref # not in eTrack and thus likely not in Bulk Upload file.
- Claim $ not equal to Paid $
- Entry in Bulk Upload but not in Payment Run Report
- For matching Claim Ref #, NDIS# is different between eTrack and Payment File
- For matching Claim Ref #, Participant Name is different between eTrack and Payment File
- For matching Claim Ref #, Support Number is different between eTrack and Payment File
Displayed Fields
eTrack displays the following fields collated from the Payment file and matching eTrack data:
RegistrationNumber Upload # Upload Date NDISNumber SupportsDeliveredFrom SupportsDeliveredTo SupportNumber ClaimReference Quantity UnitPrice GSTCode Billed $ PaidTotalAmount Payment Request Number Participant Name Capped Price Payment Request Status Error Message eTrack Warnings ClaimType CancellationReason Staff Member Hrs or Expense Past Uploads ABN of Support Provider
How to find he correct Payment File
Here is a guide to finding the correct payment file in the ‘my NDIS’ portal.
- You need a payment filename the same as the Bulk Upload filename.
(If you have downloaded a file named like fa7de04d-1d20-1eee-733c8505c5de.xls this it is WRONG!) - Login to ‘my NDIS’ and click Payment Request box and then View Payment Request box (or equivalent if NDIS have changed it).
- Fill in as below:
a) View By = Uploaded Bulk Payment File
b) Search By = Duration
c) From Date and To Date can be the same date of the upload, or a wider date range if can’t remember. - Click
 to populate the ‘Bulk File Name’ dropdown.
 - Select the Bulk File Name that you wish to reconcile.
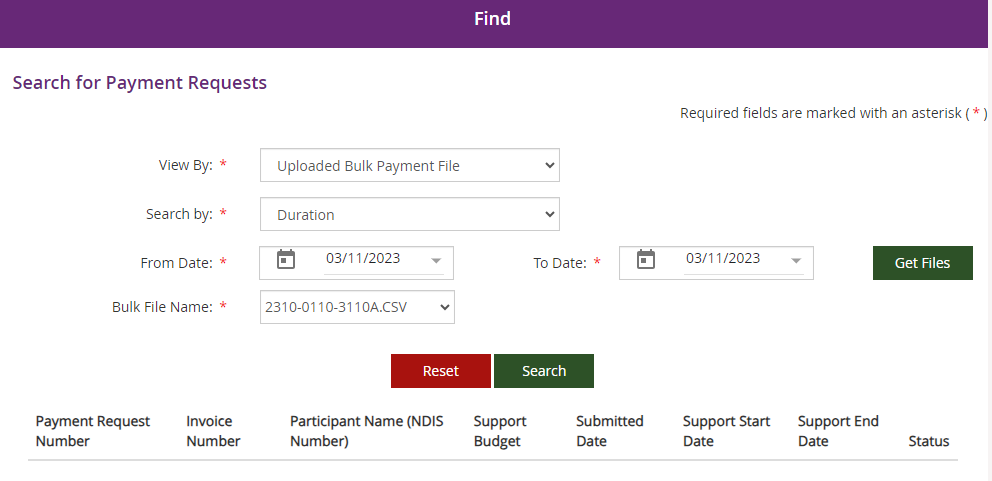
- Click green Search button.
- Scroll right to the bottom of the list.
- Click green ‘Download Results’ button and Save the file.
You can’t save to your C drive (that is labelled Client C) so select M: (Client C):/users/<your username>/<a folder of your choice>. Or navigate to a folder under Onedrive.